

A leaky faucet isn’t a health hazard, but it can waste a lot of water – according to the United States Geological Survey (USGS), a faucet that drips once per minute wastes 34 gallons of water a year. That can add up to a lot of extra money on your water bill, not to mention, it isn’t very environmentally friendly to let clean water go straight down the drain.
Lucky for you, it’s easy to fix a leaky faucet yourself. Just shut the water off, disassemble the faucet, and replace the worn or broken parts inside. Follow these steps to stop the drip.
1. Shut Off the Water

Before you start working on your faucet, you need to shut off the water to the sink, or else you’re going to have a bad time. Your faucet acts as a dam to hold back water under pressure in the line, so if you don’t stop the flow of water, it will come gushing out as soon as you start to disassemble the faucet. Look underneath your faucet for the hot and cold water valves and turn them counterclockwise to close them.
2. Prepare Your Tools
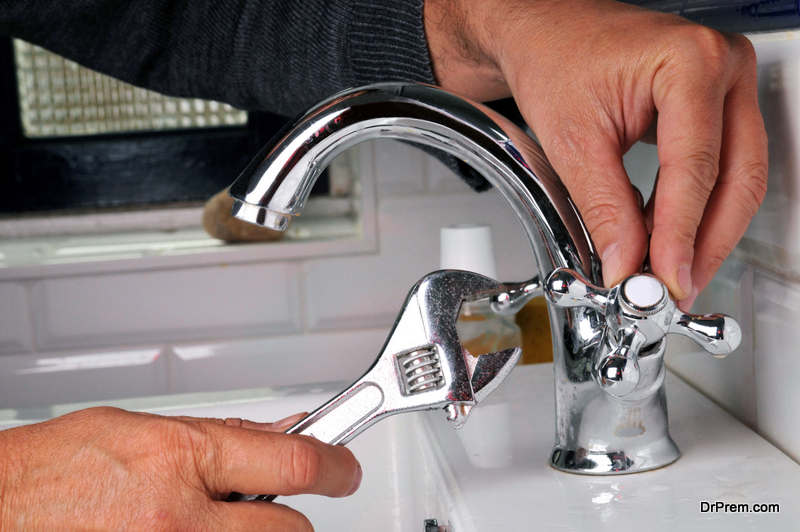
Next, you need to get your tools ready. You’ll need a kitchen towel or a plug to cover the drain, a flathead screwdriver, a hex screwdriver, penetrating oil, plumbers grease, and a toothless wrench. If you don’t have a toothless wrench, wrap duct tape around the teeth of a regular adjustable wrench. That way, you won’t accidentally scratch up or damage your fixture while you’re taking it apart and putting it back together.
Before you start taking apart your faucet, place the towel in the bottom of the sink to cover the drain, or plug the drain if you have a plug. That way, you won’t risk dropping any tiny parts down the drain.
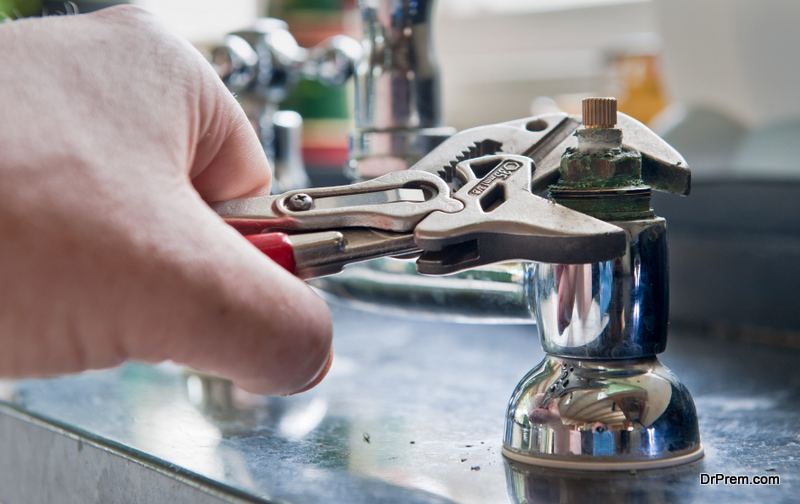
3. Disassemble the Faucet
To disassemble your leaky faucet, you will need to find the screw that holds the faucet handle in place. If you have a compression faucet with a hot water knob on one side of the faucet and a cold water knob on the other, pop the decorative cap off the leaky handle to expose the screw and remove it. Pull off the handle, then use your wrench to loosen the packing nut at the top of the stem, then loosen the stem itself. Lift the stem out of the faucet.
If your leaky faucet only has one handle, chances are it’s a washerless faucet with a ceramic disc, cartridge, or ball. Look for a metal or plastic cap on the top or side of the faucet handle. Pop it off with a flathead screwdriver or pocket knife to expose the screw that holds the handle in place. Remove the screw and take off the handle to expose the internal faucet parts.
As you remove the internal parts from your leaky faucet, lay them out in the same order you removed them. That’ll make it easier to reassemble them.
4. Replace the Worn or Broken Parts
If you’re fixing a compression faucet with stems in the knobs, you will need to pull the leaky stem out of the knob, then unscrew the rubber washer (called a seat washer) from the bottom of the stem. The seat washer is on the bottom, and the O-ring sits on top of it. Replace both. It’s a good idea to take the old stem, washer, and O-ring to the store with you when you buy new faucet parts, that way you can be sure to get the right pieces. Coat the new washers with plumbers grease before you put them back in the faucet.
If you’re repairing a washerless faucet, you may want to replace all of the parts inside the faucet. It’s easier than taking apart all the tiny components and putting them back in correctly, especially if you have a ball-type washerless faucet. To replace a cartridge in a faucet, you may need to carefully remove the retaining clip that holds the cartridge in place – use needle-nose pliers for this. Pull straight up on the cartridge to remove it. Replace it with a new one that matches the length of the old one as well as the stem end where it connects to the handle. Make sure to put plumbers grease on the O-rings before installing a new cartridge.
To fix a leaky ball-type faucet, it’s often better to just buy and install all new internal parts, because it can be hard to pinpoint which component or components are leaking. To fix a leaky faucet with a ceramic disc, remove the handle and cap, then take out the screws holding the ceramic disc in place. Pull it out of the faucet, then carefully pry off the neoprene seals from the ceramic disc. Clean the inside of the faucet with white vinegar and a gentle scouring pad. Replace the damaged neoprene seals and put the faucet back together.
5. Reassemble the Faucet
Once you have replaced the faulty internal parts, put your faucet back together by replacing the pieces in the same order you removed them.
6. Test the Faucet
Once your faucet is reassembled, it’s time to test it. Open the cold and hot water valves and then turn on the faucet. Expect some air to come out. Once the air has been pushed out and the water is flowing normally, turn the faucet off and check for drips and leaks. Congratulations – you’ve just fixed your leaky faucet!
Article Submitted By Community Writer

