

Building concrete stairs requires several steps. Formwork, reinforcement bars, finishing, and curing are steps to making an outside stairway. To make concrete stairs, you’ll need a lot of technical and design expertise, and it’s best to leave it to the professionals. However, what if you are a newbie and prefer to do the concrete stair construction yourself?
Now you only need to look at this guide on constructing concrete stairwells. You’ll need to walk through the entire process step-by-step from the beginning to the end. As a result, the process of building concrete stairways can now begin.
Building concrete steps:
Step-1: Measuring your concrete stairs
Check your local building codes for required dimensions before building concrete steps. Remember to research the requirements for railings.
The riser is the step’s vertical face, while the tread is its horizontal surface. To calculate the overall size of the concrete stairs, first, calculate the full rise and run of the steps.
It measures the distance from the ground to the step landing or platform. That is the whole stair ascent.
For a total rise of 28 inches, four risers of 7 inches will suffice. If the overall height is 24 inches, four 6-inch risers will do. A comfortable riser usually is 6-8 inches.
You can calculate the run after the risers are determined. Each tread should be 12 inches deep with a 6-8 inch rise. A wide top track or landing is required if the stairs lead to an entry.
So, if the top landing is 36 inches and the other three treads are 12 inches, the entire run of the concrete steps is 6 feet from the building’s face. If this is too far, change the top landing.
Building concrete steps requires STEP 2: PREPARING THE BASE. Considering the rise and run of your concrete steps can help you choose a width. Each side should be 6 inches broader than the entryway.
Make the area in front of the door 6 inches wider than the concrete stairs. Remove all grass and topsoil to a depth of 6 inches.
Add gravel or crushed rock after removing the topsoil and leveling the surface. Hand tampers the newly poured material to create a strong foundation.
To prevent frost from getting under the stairs and shifting them, lay down 2 inches of polystyrene before filling with gravel.
Step-2: Building the concrete stair forms
You can make the concrete stair forms from 3/4 inch plywood, 2x8s, or 2x6s. The stair’s ascent and run will determine the material.
If you’re using plywood to make concrete steps, first cut out the sides. Measure and cut according to the stair’s entire rise and run from STEP 1. When finished, the plywood should resemble a stair silhouette.
For 2x8s, cut the bottom length first as it will be the longest, then stack the rest 12 inches below it. Sides are made by screwing 2x4s together.
Set the side forms in position, plumb them, and secure them with 2×4 pegs driven into the ground around the states. Nail or screw the risers to the side forms. A rise of less than or equal to 7 1/2 inches plus more than 5 1/2 inches, rip the 2×8 (2×6).
Once they’ve been nailed, staked, and set in place, you should level forms. The stairs need to slope away from the house to prevent puddles.
If the concrete feels heavy, the forms will bend outward, so use 2×4 supports to protect them from bowing.
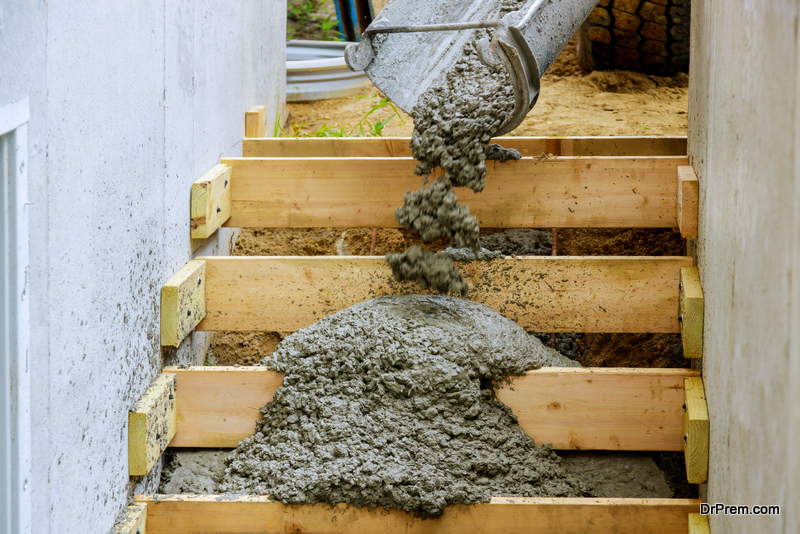
Step-3: Leaving concrete in the concrete stairs
You can mix concrete from bags or call a redi-mix concrete firm to deliver it pre-mixed on a concrete truck.
So, if the steps require more than 20 bags of concrete, I recommend calling a redi-mix concrete company. It’s easier and faster than mixing by hand.
Pour concrete first into the bottom step. Consolidate the concrete by hammering the exterior of the forms and spading the inside with a shovel.
Continue this process, filling the forms to the top with each step.
It’s usual for some concrete to sag under the risers during pouring. After 20-30 minutes, re-strike them. It should be stiff enough to hold now.
Then use a hand float to level up the concrete’s surface. Allow it to sit until the bleeding water has drained.
Step-4: Finishing the concrete
A great-looking set of steps requires a nice finish on the concrete.
The concrete should be dry enough to not show any water on the surface but moist sufficient to build up some cream when troweled.
After troweling the surface smooth, drag a broom across it to give it a non-skid texture. Remove the riser boards and check the concrete for sagging or dips. (About an hour after pouring)
You can sweep or trowel this surface after removing the riser boards. The sponge has a distinct texture to the broom.
Step-5:Keep the concrete wet
Let the concrete set overnight after finishing. The next day, remove the side forms, fill any voids with concrete patch material, and hose down the concrete. The longer it stays moist, the better (2 – 5 days if possible).
After a few weeks, seal the concrete to protect it and make it easier to clean.
Constructing concrete steps is entertaining. Take your time, double-check your measurements, utilize braces, and ask for guidance. Concrete pouring is always easier with two.
Conclusion
That’s all there is to constructing the concrete stairs. Making concrete steps is simple. Follow this step-by-step instruction to learn how to make concrete steps. This concrete step-by-step guide will cover everything from planning to finishing and curing.
But Measure at least twice or three times to ensure that you get it right the first time! Because some stages might be physically taxing, enlisting the assistance of loved ones is highly recommended. It’s enjoyable to build concrete steps, and with this guide, you’ll get it correctly the first time. Click here for more professional help with concrete steps!
Article Submitted By Community Writer

