
One of the very important aspects of developing or building a project is to have landscape planning. It gives a picture of the completed landscape that property owners’ wish to see before the initiation of the project. A project without landscape planning has greater chances of wasting time and money over the mistakes that could be prevented with proper landscape planning. Overall design of the landscape ensures proper utilization of space. It helps to plant all the necessary plants at the right place during the start of the project. This avoids moving of plants, which are often difficult to re-dig and replant them elsewhere. Landscape planning accentuates the visual connection between the land and the buildings. It gives a chance for the property owners to think through the best application of the land and adjust the decision, if necessary.
To see your dream into reality, it is essential to draw up a detailed landscape plan. The process of drawing a landscape plan needs a few processes that can be broken in smaller chunks for better management.
Planning
Tools for landscape planning: Graph sheets, felt pens, tracing sheets, color pens, wooden stakes and strings, ruler marked in eights or tenths of an inch, solid table for support, eraser, t-square, circle template, triangle and compass are some of the items that you will find useful in the entire process of drawing a landscape plan.
Measurements: Obtain the deed map/plat map of the property, which will indicate the measurements of the property. Deed map provides better orientation of the land and is useful to make your own calculations. Purchase of property entitles you to receive a deed map from your builder or developer. If you do not have it, you can get a copy from the county recorder’s office. Deed or plat maps are to-scale drawings.
Check the distance from the property to ensure that it is in the right location on the map. Make sure to determine the directions and other measurements of the property are correct. Taking the correct measurements is a key factor for drawing a landscape plan. These are the essential connecting points that will help in plotting the landscaping. You will need a tape measure to measure the boundaries, length and width of the property. You may have to repeat the same process for all the four corners of the property. Record all the measurements.
Once you finalize the physical attributes of your property, you must determine the needs and wants of your landscape. Charting out the actual needs and wants augments the effectiveness of the landscape over several years.
Site survey: Along with the exact measurements of the property, it is also useful to survey the site which involves true and specific evaluation of the property. Site topography, soil, drainage, existing structures, trees & plants are some of the categories that need proper evaluation.
Conventions in the plan: Before you start preparing the draft of the landscape plan, you must decide on the conventions that should be followed for various elements in the plan. For example, buildings can be represented with simple shapes as rectangles, circles for trees and shrubs, terrain changes with dash or dotted lines, paths, driveways and sidewalks with smooth lines and a legend to describe the symbols in words.
Creation of the drawings
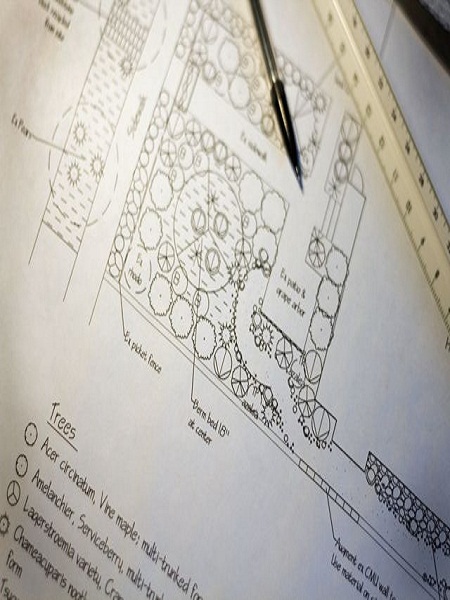
Creation of Scale Drawing: With the correct measurements, you can convert these measurements of the property on the graph paper. You may need several sheets of graph paper. Graph sheets are great and handy to scale the drawings as they are equally spaced. It is easier to scale the physical measurements of the property on the graph paper. You may require multiple sheets of graph paper to create scale drawings of large properties on graph sheets.
Plan the scale of the graph sheet in relation to the measurement of the property. E.g., each square on the graph sheet can correspond to 10 feet. Measure the corners, exterior walls and angles of your property and plot them on graph paper. Also, include the measurements of decks, sidewalks, driveways, trees or anything that you desire to have in your landscape. Mark them accurately on the graph paper to get an exact impression of your property. Even the slightest errors can make it difficult during landscape implementation. Always, reference the drawing to the north as indicated in the plat map and mark this on the graph.
It is essential to plot the basic property plan on the drawing. You should identify rooms, windows, existing decks, patios, street lights, lakes, power lines and other existing features around the property such as drainage ditch, hills, slopes etc. Take a walk around the property to note and plot to ensure that every feature/function around in and around the property is accounted.
Overall, the graph map should include, the north arrow to indicate the direction, existing trees or plants, property lines and the scale used.
Your base copy of the landscape is ready once you have noted down all the measurements, features in and around the property. Make photocopies of the base copy as you will need them to revisit the design and make modifications if required.
Functional or Bubble Diagrams: A bubble diagram is a drawing that represents space. It consists of bubbles that are connected using solid, wavy or broken lines to represent the relationship between the bubbles. Bubble diagrams are useful to understand the layout, relationship, space among other things of the property. These are simple drawings that help to understand the design in a better way. You need a tracing paper to make bubble diagrams. You can represent features such as buildings, storage area, fence, children play area, lawn, garden, patio, orchard, swimming pool, space for sports and other attractions. Do not go into lot of details as bubble diagram just represents the major features in the landscape. Check the size of each bubble to ensure that they reflect the actual size of each function/feature. Make sure that is enough space between each bubble.
You can think of several ways to organize the space to efficiently create a landscape layout plan. Consider how people will move between landscape, house and garage. Other elements such as drainage patterns, utility location play an important role and could possibly affect the landscape design. You can try different themes by organizing the space in a different manner. Examine the functionality of all bubble pairs and think how well they can work together. For example it may not be wise to keep vegetable garden next to children’s play area where the chances of them straying into the garden is more. You can thus prepare up to three to five different bubble plans to test each of them for viability. Once the bubble plans pass the test, narrow down the number of plans to two that seem to be practical and visually appealing.
Creation of bubble diagrams: Keep a tracing paper on the scaled diagram and trace the lines onto the tracing paper. Since the tracing paper is transparent, it is easy to copy the whole contents of graph paper onto the tracing paper. Remove the tracing paper. You will notice the blank space on the tracing paper, as indicated by the measurements and drawing. These are the area that you could plan to use for landscaping. Draw bubbles or loose shapes to identify various activity areas. Use of similar shape or form creates consistency throughout the design and makes it easier to understand as well. Name each bubble or shape such as ‘lawn’, ‘work area’, ’garden’, etc. as per the plan. You can repeat the same process on the other free area that is available.
You will also notice areas in between the bubbles which are usually, paths or driveways. It will be useful to name these areas for better identification. Verify the bubble diagram. You can use fresh tracing paper in case of any modifications or revisions to the bubble drawing.
Connect the bubbles with stakes and strings: In order to get a better visualization of what may or may not work in the landscape, it is better to plant the wooden stakes on the area that you intend to landscape, in the bubble diagram. Connect the stakes with strings, to get a fair idea of how the landscape will look on the bubble diagram. Repeat the process for all the bubbles in the diagram. Staking and stringing helps to visualize the final layout of landscape. Pay attention to the human movement between the bubbles and traffic volume of each connection to design roads of appropriate width and strength. In case you plan to add water body to the landscape, plan for the irrigation system to assess the water requirements.
Check if you have utilized the space effectively. If there are revisions with respect to the space, readjust the stakes and strings. Once finalized, take measurement of each staked area to get the final measurements.
Plant selection
Once you have functional design of the landscape, it is time to select the type of plants and use appropriate symbols to represent them in the landscape plan. Few factors such as light, moisture tolerance, soil requirements, texture, shape, flowers, fruit, the mature size of the plant (height and width), sun, shade, must be considered that will fit your landscape. You may also want to consult books on gardening, nursery catalogs or visit the local nursery to understand the different type of plants. It is better to familiarize yourself with the plant materials and discuss your plans with nursery growers to verify your decision and selection. By selecting the right type of plants, you can ensure that your landscape is environment friendly as well as aesthetically pleasing. In order to design a sustainable landscape, use strategies such as
a. Use plants that thrive in the local atmospheric zone.
b. Select plants that are resistant to insects and disease.
c. Making the maximum use of the existing topography of your property.
d. Selecting plants that retain moisture and nurtures tree growth.
Lack of knowledge of the characteristics of plants can lead to a disastrous design and implement the landscape. You may have to end up redoing the landscaping due to lack of consideration given on the characteristics of a mature plant. It is quite important to plan the landscaping at the nursery or the garden. It is wise to know about your planting zone and then decide on the specific plants for that zone. For example, certain plants grow well and are great to be placed outdoors in the summer in pots but they should be duly moved indoors during the harsh winters.
Final landscape plan
Translate all the final measurements from the bubble diagram to the scale diagram. When you are preparing the final plan it is important to keep in mind the shape of the tree or shrubs, height of the fully grown plant to ensure there is enough spacing in the landscape. You must label each element of the plan on the scale diagram for easy reference. It is also better to take notes that are specific to landscaping, such as soil type, shady areas etc. You may also want to add other elements to your scale drawing such as property lines, existing structures, driveways and walkways etc. You can also include the materials that will be added to the landscape. Do label all the elements with legends which will explain the labels, if you need to refer to them at a later point of time.
Once you have finalized the measurements, labels and other elements on the scale diagram, take a blank sheet of paper and place carbon paper on it. Place the revised scale diagram on top of the sheets and trace the updated scale diagram. This is the final landscape plan. You can color each landscape area with distinct color. Grass can be depicted in green, water in blue, plants and trees in a darker shade of green and so on.