

Commonly known as an angle grinder, the disc or a side grinder is a handheld power tool that is commonly used in construction industries for grinding, cutting and sanding. Also used by some in their houses for grinding and cutting through hard materials such as concrete, wood and metal, this power tool’s cutting capacity is dependent on the type of blade being used. Using appropriate blades helps prevent injuries and improves efficiency.
Here’s a brief tutorial on how to change the blade of an angle grinder.
Difficulty Level: Easy
Resources required
1. Philips head screwdriver
2. Vise grips
Instructions
A variety of blades are usually used in an angle grinder depending on the material being cut. However, it is essential to replace these blades when they get worn out. Proper precautions must also be taken while replacing these old jaded blades.
Step 1
Unplug the grinder from the mains. If the grinder operates using a battery, remove the batteries. This would prevent accidental starting of the power tool.

Step 2
Next, use a screwdriver and remove the screw holding the blade guard. However, if there is a latch holding it, then release the latch. This will help removing the blade easily.

Step 3
Next, as you press the blade lock button, continue holding it in and turn the grinder upside down, so that the grinding wheel faces upwards. Using the other hand, attempt turning the wheel. If it doesn’t turn, then this implies that the wheel is locked. However, if it does turn, then hold the lock button. The lock button for the blade is usually located by the top left or right side of the grinder. In some models it is also located on the bottom side, while it is near the trigger in some.

Step 4
Next, turn the arbor nut anti-clockwise by using a wrench (usually provided with the grinder). If the wrench also has prongs, place these prongs onto the hole present by each side of the arbor nut. Now, turn the nut anti-clockwise as is demonstrated in the below image.

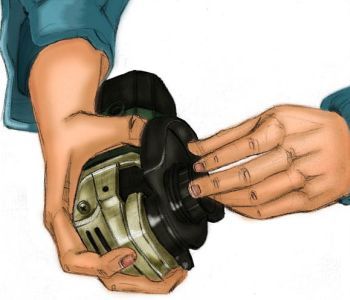
Step 5
However, if there is no wrench provided by the grinder manufacturer, loosen the arbor nut using vise grips by grasping the nut and turning it anti-clockwise (as shown below).

Step 6
After this is done, remove the arbor nut and lift off the old blade. Replace it with a new blade. After positioning it, reinsert the arbor nut and tighten it with vise grips or wrench as available. Take care not to over-tighten this nut. This done, check if the grinder’s replaced blade is working properly on a wooden material. Check out the below image for necessary directions.

Things to watch out for
• Use blades that are in a good condition.
• Change the blade as soon as it gets worn out.
• After replacement of the blade, make sure to reinstall the blade guard.
• This done, turn on the grinder for testing of flaws, if any. Take care to run the grinder away from self and people if any, nearby. If the blade is in a god condition, the grinder will run without causing a problem. However, otherwise the blade will fly off in less than a minute.
• Do not forget to wear safety glasses when working with a grinder.

