

The average lifespan of driveways is around 30 years. However, it’s hard to achieve that if your driveway is not well installed and well-maintained. Performing regular maintenances like crack filling and driveway sealcoating can go a long to ensure that your asphalt driveway lasts its desired lifespan.
Driveway sealcoating is a process of applying a protective coating to asphalt-paved surfaces. This coating helps to fill in cracks and prevent water damage and provides a barrier against UV rays and other types of wear and tear. While professional driveway sealcoating can be costly, many homeowners opt for do-it-yourself (DIY) methods. This typically involves renting or purchasing a sealcoating machine and mixing the appropriate amount of sealant.
DIY driveway sealcoating can be a time-consuming process, but it can also be very rewarding and satisfying for DIY enthusiasts. Not only will it help to prolong the life of your driveway, but it can also give you a sense of satisfaction knowing that you did it yourself.
So, how do you sealcoat your driveway yourself? In this post, we shall give you a comprehensive guide to DIY driveway sealcoating. Let’s delve in!
Plan for the weather
The experts from CSG Sealcoating, Orlando say that the first step is to check the weather forecast and plan your sealcoating project around it. Ideally, you should wait for two or three days of dry, warm weather before beginning the project. This will ensure that the sealant dries properly and doesn’t get washed away by rain.
Calculate how much sealant you need
Next, you need to calculate how much sealant you will need for your driveway. To do this, simply measure the length and width of your driveway in feet. Then multiply these numbers together to get the square footage. For example, if your driveway is 10 feet long and 20 feet wide, the square footage would be 200 square feet.
Once you know the square footage, consult a sealcoating coverage chart to determine how much sealant you will need to cover the entire area. For example, if the chart says that one gallon of sealant will cover 100 square feet, you would need two gallons of sealant for your 200-square-foot driveway.
Gather the necessary supplies
Now that you know how much sealant you need, it’s time to gather the rest of your supplies for the project. This includes:
- A sealcoating machine or brush and squeegee
- Sealant
- Stirring stick
- Measuring cup
- Broom
- Shovel
- Wheelbarrow (optional)
Prepare your driveway
Once you have all the supplies, it’s time to prepare your driveway for sealcoating. You need to do several things to prepare your driveway for sealcoating. These things include:
1. Trim grass and shrubs around the driveway
The first step is to trim any grass or shrubs around the driveway. This will make it easier to apply the sealant evenly and prevent the sealant from sticking to the foliage.
2. Clean the driveway
Next, you need to clean the driveway. This can be done with a power washer or a garden hose with a nozzle attachment. Be sure to remove all dirt, debris, and oil stains from the asphalt surface.
3. Fill in cracks
After cleaning the driveway, you need to fill in any existing cracks. This can be done with either cold-pour crack filler or hot-pour crack filler. If you’re using cold-pour crack filler, simply squeeze the filler into the cracks and smooth it over with a putty knife. If you’re using hot-pour crack filler, melt the filler in a melting pot and then pour it into the cracks. Use a putty knife to smooth it over.
4. Patch potholes
Potholes can also be filled with either cold-pour or hot-pour crack filler. Simply fill the pothole with the filler and then use a putty knife to smooth it over.
5. Clean any oil and gas stains on your surface
Next, you need to clean any oil or gas stains on your driveway. This can be done with a commercial degreaser or a strong detergent. Apply the degreaser or detergent to the stained area and scrub it with a brush. Rinse the area off with water and then allow it to dry completely.
6. Prime the surface
After cleaning and preparing your asphalt surface, you need to prime it. This will help the sealant adhere better to the surface. To prime your asphalt, mix one-part primer with 10 parts water and then apply it to the surface with a brush or roller. Allow it to dry completely before proceeding to the next step.
Applying the sealant
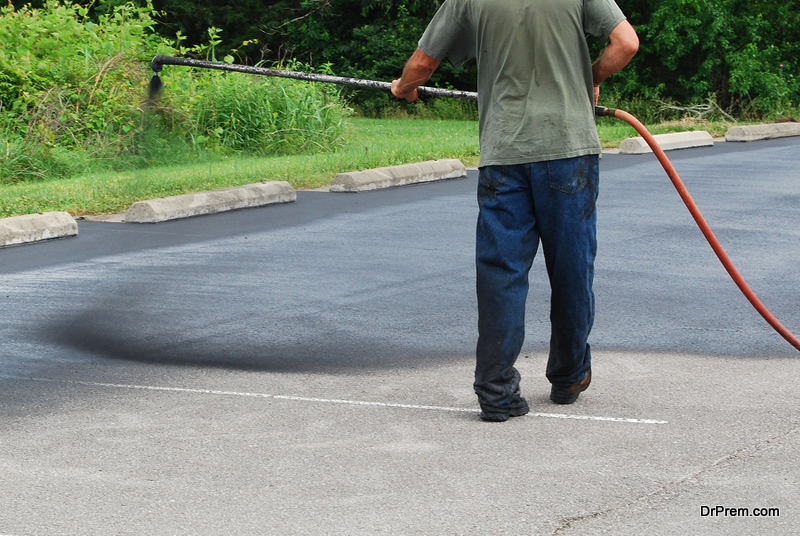
Once your surface is prepared and primed, it’s time to apply the sealant. If you’re using a sealcoating machine, simply pour the sealant into the tank and then follow the manufacturer’s instructions for operating the machine.
If you’re using a brush, pour the sealant into a bucket and then dip your brush into the sealant. Apply the sealant to the driveway in small sections, working in one direction. Be sure to overlap each stroke by about six inches.
After applying the sealant to the entire driveway, allow it to dry for 24 hours before walking or driving on it. Once it’s dry, your asphalt will be protected from the elements and have a nice black finish.
Tips and tricks for getting a good finish
- Use a squeegee to remove excess sealant – if you find that you’re putting down too much sealant, simply use a squeegee to remove the excess.
- Use a brush to apply sealant in hard-to-reach areas – in case you have a driveway with a lot of curves or have trouble reaching certain areas with the sealcoating machine, simply use a brush to apply the sealant.
- Add sand to your sealant for traction – if you live in an area with a lot of snow and ice, you can add sand to your sealant. This will provide extra traction and prevent your driveway from becoming slick when wet.
- Use a sprayer to apply sealant in large areas – if you have a large driveway or you want to avoid using a sealcoating machine, you can use a garden hose with a pump sprayer attachment to apply the sealant. Simply mix the sealant according to the manufacturer’s instructions and then put it into the pump sprayer. Apply the sealant to the driveway in even strokes, working in one direction. Be sure to overlap each stroke by about six inches.
- Let the first coat of sealant dry before applying a second coat – if you want your driveway to have a thicker layer of protection, you can apply a second coat of sealant after the first coat has dried. Simply repeat the process outlined above.
Sealcoating your asphalt driveway is a simple and effective way to protect it from the elements. By following the tips and tricks outlined above, you can get a professional-looking finish that will last for years to come.
Article Submitted By Community Writer

