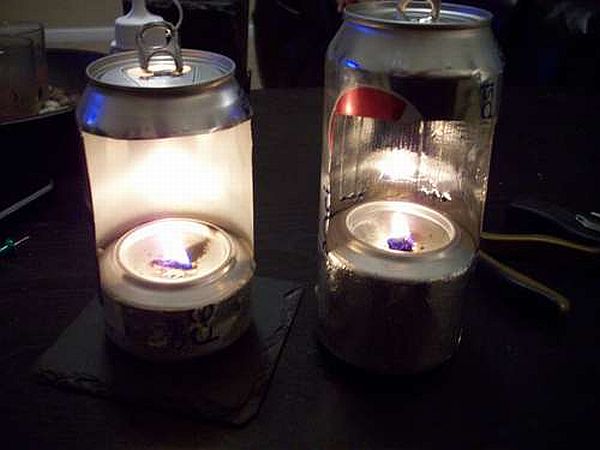

The practical alternative to the candles is what we call oil lamps. Lanterns and candles have been used for centuries as a means of providing light both inside the houses as well as outside. These lanterns and candles used oil made from vegetable or animal fat. Although purchasing of lamps and lanterns from the market is a feasible option, the old soda bottles can be used to make beautiful oil lamps which create dramatic lightening effect as well as a very eco friendly way of recycling old used soda cans.
The reason for the requirement of using soda can oil lamps can be summed up in points as follows:
- It acts as an insect repellent.
- The oil lantern can be used as an emergency light.
- It can be used as a persistent source of flame for aesthetic values, in a controlled manner.
- They burn less slowly than the candles thereby adding a great advantage at the time of electricity outage.
- The oil lamps are reusable; you just need to add oil on timely basis as per requirement.
Read on to know how to recycle soda cans into an oil lantern.
Difficulty level: Easy
Time required: 30-40minutes
Resource required: Scissors, soda cans – 2, pocket knife, glue, ceramic wick material or cork, dry flowers or beads.
Instructions
1. The cans with the narrow bottom are preferred for the purpose of making oil lamps.
2. With the help of pins holes are punched around the silt which serves as fill holes. The hole is made at the upper rim, which serve as a vent while filing.
3. The two cans are joined one over the other forcefully. The glue is applied to seal the joined cans. This acts as a burner or a reservoir for the fuel. The cans are punctured from the bottom with the help of the scissors and the edges are cleaned properly.
4. Make sure the glue is applied to the wrinkled spot to seal it properly. The use of gorilla glue is preferred if available as it expands in the cracks.
5. After sealing the burner or the reservoir is ready, all you need to do is to make the reflector to hold it.
6. After the glue dries, the lower edge of the pop tab is pushed down, window is cut to make the reflector. With the help of the glue and the tape, the reflector is fixed to the lower edge.
7. Let the soda can lantern dry overnight. After it is dried the tape is removed and fuel is added to make it ready for the use.
Frequently asked questions?
1. Can I mix fragrances?
Ans: Yes, you can mix fragrances of dry flowers or beads. But one thing to note is that strong fragrances will overcome the flame smell, so keep the fragrances to be lighter.
2. Is it necessary to change the wick every time we change the fragrance?
Ans: No, it’s not necessary. But, make sure to squeeze out any excess fragrance before adding another fragrance. Remember, you should not rinse the wick burner with water or any other liquid.
3. How long would the wick or burner lasts?
Ans: If the burner is used properly, it could handle about 250 lightnings and can survive for about 1-2 years.
4. If the lamp burner does not stay hot after flaming?
Ans: If the lamp burner is not hot, you have to redo the steps by drying the burner and then lighting it up again. If it’s still not hot, the burner needs to be replaced.
Quick tips
1. Paper, cotton wool and rope can also be used for making the wick.
2. Aromatic oil can also be added in the lamp as it acts as scent.
Things to watch out for
1. Large reservoirs should be avoided unless the oil is thin or else the it will be difficult to get the fuel to wick.
2. Before lightening the lamp, remember to blow out the flame as it will not do its job on its own.
3. Too much oil in the lamp must be avoided as it might get tipped over. Also, it is advised to fill it half.
4. The oil must not be kept unsupervised. It could be dangerous for children and pets.