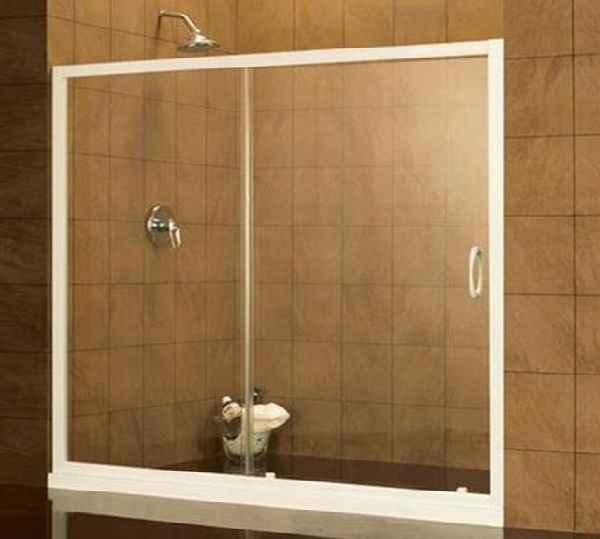

There are several things important in the life, we never notice. Have you ever notices the importance of the shower doors? You might have not, until you faced a broken door issues. Changing a shower door might sound unimportant, but when you have multiple users of that same shower, the scenario changes completely. Shower doors are for not only your own benefit but it also prevents unnecessary water spillage in your room. Here you can know the simple steps to install a shower door.
Difficulty level: Moderate
Time required: 3 to 5 hours
Resources required
1. New shower door
2. Tape
3. Sealant, preferably water proof
4. Screw-driver
5. Leveling gauge
6. Drilling machine
7. Caulk gun
8. Hammer
9. Punch
10. Files
11. Saw
12. Utility knife
13. Putty knife
Instructions
Step 1: Panel removal
First you need to remove the outside door panel followed by the inside one. For that, you can just lift the door panel and remove them. The process is very easy; however, it is always better to have a helping hand to prevent accident.
Step 2: Jambs loosening and removal of bottom track
You can start loosening the jambs with the help of screwdriver and a claw hammer. First, you need to unfasten the screw from the side jambs. With help of knife, loosen the caulk and pull out the jamb. You can use a utility knife to mark the entry of your knife to loosen the caulk. When you have made cuts in outside and inside wall, then pull out the bottom track with help of putty knife and hammer.
Step 3: Remove the old caulk
The next step is the clean the attachment. You just need to scrape away the old caulks. Ensure the cleanliness of the area before the installation of the new shower door.
Step 4: Fix the bottom track
Take the new bottom track and fix them in a way that the outer lips are away from the shower on the tub ledge. If you want to have a side jamb then you can keep a 3-quarter inch gap between the sidewalls and bottom track. You can fix the track using a sealing tape and clearing the track’s position using a screwdriver.
Step 5: Side tracks installation
You need to slide down the sidetracks and then finally push it to put in place. Bring the sidetracks over the top and push down to put in place. You need to ensure the sidetracks to have a proper level. As little bit of clumsiness might make the door jammed. You can use the bubble level to do the task. When you have ensured that the sidetracks are properly leveled, then you can proceed with sealing the track with the help of sealing tape.
Step 6: Jambs fixing
When the sidetracks are in position then you can fix the side jambs. You can use the drill machine to create holes for fastening but slightly removing the tapes from its position. When the jambs are fixed then you can proceed with removal of tapes.
Step 7: Permanent jambs attachment
Remove the framework and create holes with drills and put the screw anchors inside those whole. Attach the jambs closest to side column. You can proceed with the fastening the upper and bottom part of the jamb using screws. Once they are fixed then you can hammer down the middle screw in its position and then tighten the screw.
Step 8: Installing the bottom track
When the sidetracks are in position, the bottom track is easy to install. Slide them into their proper places. Make sure they are properly lined up. The sidetracks are up, so snap the bottom track into place, making sure it is lined up along the edge of the tub, on the mark made earlier.
Step 9: Installation of the storage column
When you have fixed the bottom track, then you can proceed with storage column installation. Place the column and slide it in the place. Then you can fasten the storage column using screws.
Step 10: Fix the jamb and column
Once the storage column is installed, you can place the jamb on column and tighten it up with screws. Once the jamb and the column is fixed, you can proceed with installing the top track. Place the center jamb on the other side of the storage column and fasten it to the column with the included screws.
Step 11: Top track installation
The top track provides the smooth movement. Cut the jamb in precise measurement. It should be between two walls. If you have excess of top track then you can always file and cut them in shape. Once they are in proper shape then push down the top tracks over the wall jambs.
Step 12: Shelving units installation
Once all tracks and jambs are in place, you can install the shelving units according to your needs. You can proceed with covering all the screws and metal fasteners with covers or sealing gum.
Step 13: Caulk the frames
Caulking is very important procedure. Caulk the outside edge and inside corners. You can use silicone based caulk to prevent it from water damage. With the help of rubber gloves, smoothen any edges. Caulk the area between side jambs and walls inside the shower.
Step 14: Installing the doors
It is the little complicated process; a helping hand is very useful in this case. First you need to lift the panel using the rollers and fix it in the inner tracks of the top track. Similarly, the outside panel is to be worked out. Once you have completed the task, you need to place the shower doors and align the doors to fit the slot of the track. Then you need to align the panel guide with bottom track. Fasten the tracks using screws to fix the door in its place. Finally, check whether the door is opening smoothly or not.
Frequently asked questions
1. Where can I find the tools and doors?
Answer: You can find the tools at all local hardware stores while home decors may help you to choose one door for yourself.
2. Do I need more than one person during installation?
Answer: Yes, that will be very helpful.
3. How to remove caulk stains from the doors?
Answer: Avoid caulking after installation of door, do it before hand. You can use acetone or caulk remover to remove caulks.
Quick tips
1. Remove the old doors first and clean the area.
2. There are many preliminary temporary fixings. You can keep the tracks using tapes.
3. Extension piece can be helpful to mount the shelving tower by extending it from outside track.
4. Caulking is advised to be done before the installation of doors to prevent stains.
Things to watch out for
1. Many temporary fixings may confuse you to proceed toward wrongful installation.
2. Glass doors are heavy, so always be cautious while working with them.
3. Prevent your fingers to come in the way while sliding the door in the tracks.