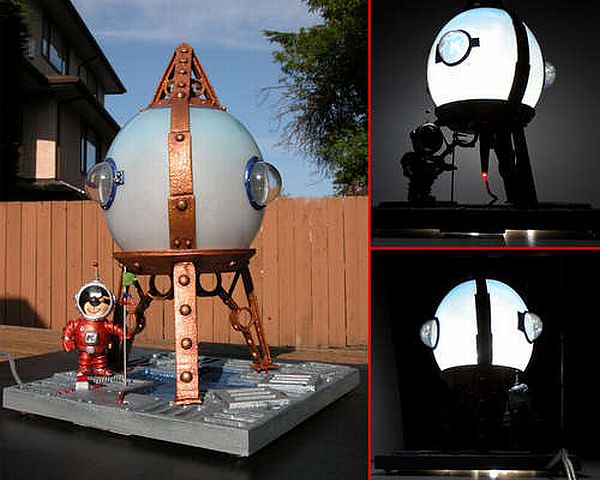

If you are interested in decorating your house with an alien theme, you should consider having a retrorocket lamp. However, the lamp is not sold in retail counters. Therefore, you will have to make one for yourself. Do not be scared as the process may sound lengthy but it is not difficult at all. With the help of some cheaply available material and home scraps, you can make a rocket lamp for yourself. You can also use metallic base but using glass bowls can make it look different from the others. Here are the set of steps that will help you make your own retro rocket lamp that will not only impart an alien theme to your house but also add a cuteness factor to it.
Difficulty level: Moderate
Time required: 5-6 working hours for assembly and 1 day to dry the glue and paint.
Resources required
1. Fish bowls
2. Stickers
3. Magic script
4. Utility knife
5. Gorilla glue or plastic bind glue
6. Heat gun
7. HDU polyurethane boards
8. Astronaut toy
9. Cat toy
10. Ping pong balls
11. Metallic paint of silver, gold, bronze and pearl white
12. Wires
13. Switches
14. LEDs for decoration and LEDs for lighting
Estimated cost
As the lamp is made from easily available items, the cost will not be more than $ 100.
Instructions
Step 1: Making the nose and the cap
First, you need to carve out the idea necessary to design the rocket. You can use polymer boards made of high density urethane. The polymer board is easy to carve and light but it has sufficient hardness. Once you have acquired the material and design idea, then you need to cut three cones and the cap covering it. Make some holes and slits to let the light shine through it. Then you need to glue to nose cones and caps. You can also decorate the nose cone with cat toys. Once it is fixed and ready, you need to mount it on the glass bowl. After that, you need to make some eyes with rivets. You can use metallic color to decorate the bowl.
Step 2: Design the bottom half
Legs are important part of the base. Carve out the HDU board to shape it like rocket legs. You need to have three legs. Once you have the legs, you should make a bottom base cap to hold the structure. You can make some slits to bottom cap to let light and hot air to pass through it. You can add some LEDs to make it look shinier. For the nozzle, you can carve out a design out of polyurethane board or cut some old light stands to make the design. After that, you need to fix the whole assemble with glue and spray paint it with metallic color to give the rocket looks
Step 3: Create some support
The support straps are very important, as the fish bowl on polyurethane is not a stern structure. You can use the leftovers of the board to create support stands for the entire assembly. Polyurethane is thermoplastic, so with a heat gun you can bend it any shape. Use the heat gun to make the bends to support the bowl. Once the straps are cooled, you can glue it with the bowl to give the support. You can color the straps with metallic color matching the rocket to make it a part of the whole assembly.
Step 4: Make the launching pad
The launching pad will not only accentuate the whole look but it also will impart stability to whole structure. You can also fix your light switching board in it. You can use the polyurethane board to make the pad and glue to entire assemble on it. You can use the leftovers of the board to make small quarters to mimic the research and launching headquarters. If you want, you can fix some LEDs to make it more attractive. You can cut a hole in the board to provide the switches, wire, and make two slits on the board to support the LED. You can also cover the board with magic scripts to hide the wire clutter. Once ready, you can paint the pad with metallic bronze color to give the look of the ground-based launching pad
Step 5: The astronaut
You can buy an astronaut toy and glue it together or you can use ping-pong balls to make the head and old plastic balls to make belly. The legs can be made with polyurethane and you can make other decorative items with magic scripts. You can clothe it with belts, plastics to mimic the space look. You can spray paint it with metallic color to make the assembly.
Step6 Preparing the bowl.
Stick some stickers in the inside of the ball and spray paint it with pearl white color. Once the paint is dried, you can remove the stickers and wash the area with acetone to create transparent shapes for passing the light. Install a LED lamp inside it. Once the system is ready, glue the upper structure and lower structure with fish bowl lamp. The bowl lamp will now act as the belly of retro rocket system.
Step 7: Reveal the rocket lamp
Once every thing is ready, switch on the light and enjoy the view of your own retrorocket lamp. The LED bulb at the base and light coming out of the slits and transparent shapes will make it look like a real rocket.
Frequently asked questions
1. What can I use instead of fish bowl?
Answer: You can use any shaped structure but make sure it is transparent.
2. Is the system strong enough?
Answer: If you design the support system as per the instruction, you can have a strong hardy lamp.
Quick tips
1. Keep acetone or nail polish remover with you to remove any glue stain on the fishbowl
2. Do not assemble the fish bowl first as it will make the structure heavy and unstable.
3. If you do not have fishbowl, any round bottom flash or glass jar will work fine.
4. Draw the structure first and then you start cutting followed by assembling.
Things to watch out for
1. Do not glue the straps to fishbowl and then use the heat gun as it might melt the glass or create some cracks.
2. Let the paint dry before carrying out with further work.
3. Be cautious while working with heat gun.