
Clock is an object which is required in every place on this earth whether it is a school, office restaurant, corner side cafe or a home. It is a product which will be demanded forever. Clocks can add grace to the interior environment of the place and can make the environment live. Creative clocks can be used in the restaurants or waiting rooms of the office so that the people waiting do not get impatient. One such amazing clock, which can hold the attention of everyone for a long time is Chain clock.
We are going to look into the insights of building this chain clock, what are the things which are required to build it on your own, what is the difficulty level of building such clock, how much time will it take and step-by-step instructions of how to build it.
Difficulty level
The difficulty level of building a chain clock is moderate – which means you may require some basic mechanical and technical knowledge to build the chain clock.
Time required
The time required to build the chain clock totally depends upon the skill of the person. For a highly skilled person, it may take about an hour to build the chain clock.
Resources required
1. Three gearmotors from ServoCity – 12 volt DC at 4 rpm
2. Three motor mounts to mount the motors on the wooden support
3. One – 1 rpm AC synchronous motor
4. Baltic birch plywood (will be used for supports and for numbers)
5. Bloodwood (will be used for the number plates ‘1 to 9’ to make a nice contrast)
6. Screws – multiple types and sizes
7. Electrical cord for AC power
8. Twenty gauge stranded electric wire for 12 volt DC wiring
9. Push-button – switches from Radio Shack (which are normally open)
10. AC transformer for the 3 DC gearmotors (part number 273 -1365A)
11. Bridge rectifier from Radio Shack
12. 5/8 ” outer diameter by 1/4 ” inner diameter ball bearings
13. 1/4 ” steel rod
14. Stop collars
15. Bolts and machine screws
16. # 35 sprockets – required three with 20-teeth with 5/8 ” diameter
– required three with 16-teeth with 1/2 ” diameter bore ( no hub)
– required three with 12-teeth with 1/2 ” diameter bore
17. Chain
# 35 roller chain – McMaster
Chain connecting link – McMaster
Tools required
Not all of the tools listed here are required, but using them will make the process easier:
1. Table saw
2. Band saw
3. Oscillating spindle and belt sander
4. Cordless drill
5. Drill press
6. Random orbit sander
7. Router
8. Router table
9. Scroll saw (for cutting out the numbers).
10. Hacksaw or cutoff saw
11. Sanding block with sandpaper
12. Screwdrivers and wrenches
13. Soldering iron
14. Wire cutters
Estimate cost
The cost of building the chain clock depends upon the availability of the material. If it is readily available then the cost decreases otherwise, it becomes a bit dearer. The estimate cost may range between $25 to 70.
Instructions
Step – 1: Collecting parts, materials and tools
In the initial step you need to collect the parts, materials and tools listed in ‘resources required’ section to be completely ready for building the chain clock.
Step – 2: Understanding how it works
The clock works with the help of one synchronous motor and three gear motors of 12 DC volt that drive the chains.
The timings of the clock is kept by the synchronous motor. The motor’s shaft makes a revolution every minute. In every revolution, the motor’s shaft closes the contact between brass strips which allow 12 volt DC to run the first gear motor which moves the “minutes”.
When the “minutes” chain comes to the zero position, then the contacts of brass strips are closed for a brief time for the second gear motor that runs the “ten minute” chain. In short, each chain triggers the gear motor that runs the next chain.
Therefore, the “minutes” chain runs once every minute, the “ten minute” chain runs once every ten minutes, and the “hour” chain runs once every hour.
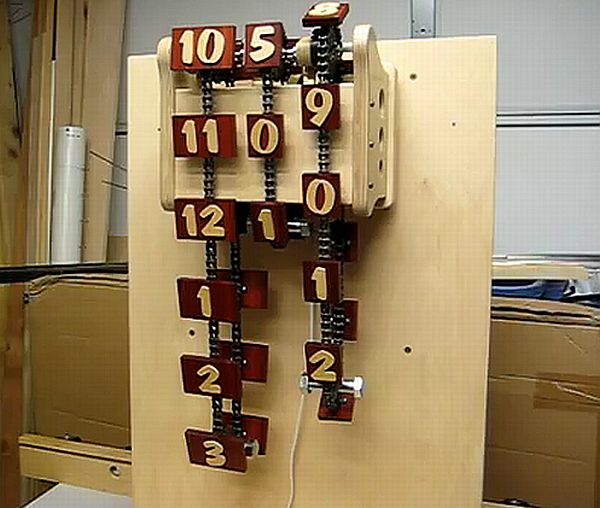
Step – 3: Wood support
The chain clock is mainly supported on four pieces of wood, which are hung on the wall using a wooden cleat system.
We will name the four main pieces of wood ( which supports the clock) back, front and two sides. The back piece supports the two side pieces and has a cleat on the back for hanging the clock on a wall or stand.
The front piece is supported by the two side pieces. The front piece holds the three gear motors, the synchronous motor, a transformer, and the quarter inch diameter shaft, which supports the sprockets and chain assemblies.
Step – 4: Metal support rod
The 1/4 inch diameter steel rod is the metal support rod. The rod helps in holding the sprockets that supports the three chains. Each #35 roller chain sprocket also has a 3/4 inch thick wood circle with flats attached to one side. These flattened circles act as a switch for the gear motor that drives that chain. These metal sprockets and flattened circles are held in place by 1/4 inch inner diameter shaft stop collars.
Step – 5: Number plates
The number plates for the clock are made from bloodwood. You can use any other wood too that can make a great contrast with the background ply. You need to cut them and drill the holes in the back of the number plates.
Step – 6: Chain assembly
Each of the three chains is made up of short sections of chain with tabbed connecting links holding them together. The wood rectangles with the time numbers are then screwed to the tabs on the connecting links.
Step – 7: Spacing the chains
The horizontal spacing between the chains is really a matter of preference and of spacing for the components.
Step – 8: Switches for the motor
The switches for the motors are made from brass strips. These are easily shaped as needed and are very quiet in operation. The flat spots on the wood circles do not touch the brass strips until the motor starts moving the chain. The chain rotates the wood circle and then the round parts of the circle push the two brass strips together to make contact.
Step – 9: Wiring
The final step is to wire the motors and synchronous motor and other components so that they work properly.
Step – 10: Optical lightning
This is an optional step. You can add LED lighting to the numbers so that they are visible even at night.
Frequently asked questions
1. How much time will it take to build the chain clock?
Ans. This totally depends upon the time you give in the project and your skill.
2. Can I use the old materials instead of buying new ones?
Ans. Of course. This project indeed encourages recycling and using old useless articles.
3. How can I make the LED lighting to work?
Ans. You can use photo cell to make your LED lighting work at night.
4. How many motors are required for building the chain clock?
Ans. A total of four motors are required. Three motors are required to move the “minutes”, “ten minutes” and “hour” chains and one motor, which is the synchronous motor is required to move the “minutes” chain every minute, which will further trigger the “ten minutes” and “hour” chains.
Quick tips
1. Make sure you cut the metal rod the exact length of the distance between the wood sides plus the depth of the holes you drilled in them. This will keep the metal rod from sliding side to side in those holes.
2. Take care of the diameter of the rod. The bearings you will use for the rod will be very close to 0.25 inches in diameter and if the rod you buy has a larger diameter, even by a couple thousandths, then you are never going to get the bearings over the rod.
Things to watch out for
1. You will use many tools for completing this project. So make sure you are familiar with the tool and all the dangers associated with it. If you are not familiar with a tool, then have someone with you who can guide you the proper way to use it.
2. Always give priority to safety, wear eye protection and hearing protection while using the tools.
3. Be patient and do work. Trying to work faster may injure you.
4. Buy the right dimensions material. If you are not technically skilled, have someone with you who can help you buy the right dimension material.