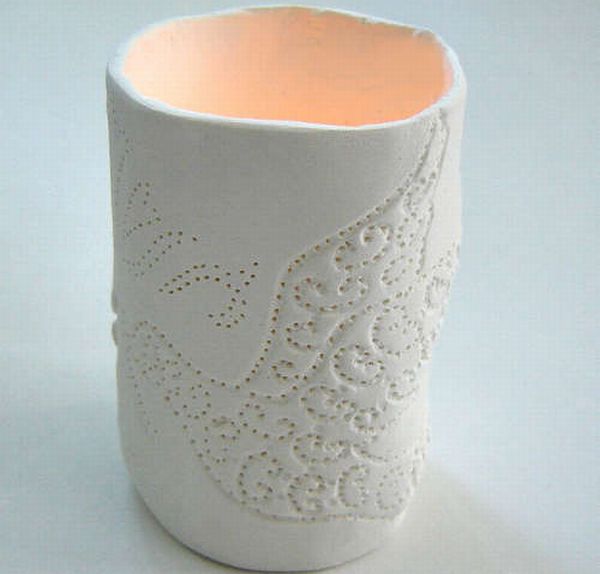

Before the advent of glass and plastic, there used to be lamps made out of clay. Resembling clay pots, these lanterns used to spread light in the houses by holding a candle inside. The candle light used to spread all over the place through tiny perforations made in the clay structure.
Even during the usage of glass for lanterns and chandeliers, clay lamps remained in existence for a long time in the houses of those, who could not afford glass-made lamps The latter were costly at that time. Today, these noble household pieces are reduced to mere showpieces and antiques to decorate the houses, rather than, being used for the purpose they were actually designed for.
The best thing about these clay-lamps is that they do not need a sophisticated machine to be manufactured. These are handcrafts, which can be designed as per the designer’s imagination, and can be decorated with colors, patterned holes and engravings. These characteristics, along with rustic look, lend elegance to these simple artifacts.
Difficulty Level: Moderately Easy
Time required: It varies person to person
Resources required:
- Any kind of clay of any color
- Clay-rolling and -cutting tools
- Mat
- Things, like stamps and stencils, that can make impression on the clay-lantern
- Cling wrap (to protect mat)
- Bottle of the shape and size of the desired lamp
- Sandpaper
- Needle
Instructions
- Take a lump of clay and, using a roller, roll it out to 0.5 cm thickness, though the thickness can vary as per your choice.
- Cut out a rectangle from the flat clay, using a knife of height. Its length should be enough to let the edges touch each other when the sheet is rolled.
- Check that it is long enough by loosely wrapping it around the bottle and trim the edge.
- Once the desired shape is cut out of the roll, it is time for decoration. The best way to decorate a clay lamp is to use something that can make an impression on the soft clay. Stamps, jewelry, stencils, ornament – anything that has any figure that can leave a mark on the clay can be used. In order to do so, press such a thing on the clay-cutout hard enough to make an everlasting, identifiable impression, and soft enough not to let the impression tear through the clay layer. One can use a sharp object to make drawings on the clay, as long as his or her hand is steady.
- Once decoration is done, it is time to create the lamp-features. One of the main features of a clay-lamp are the holes. Using a needle or any other pointed object, poke holes all over the clay sheet in a certain pattern, so that, when light filters through these holes, they create illuminated patterns all over the walls and the floor making the place appear beautiful. Try to keep the holes 2 mm apart for better impression. Also, the needle should be used vertically and not at an angle.
- Once the things to be done with clay sheet are completed, loosely wrap the clay around the bottle and try to connect the edges together to make a cylinder. Using extra clay, seal the edges together.
- In order to make the bottom to hold the light-source, roll out another lump of clay with the same thickness like the one before. Place the cylindrical clay sheet over the roll and cut out the bottom using the base-edge of the cylinder. Using clay, seal the bottom with the cylinder.
- Once everything is done, leave the structure to dry for a few hours. Keep checking out every hour to see whether any clay-chip is coming out or not. If that is the case, either replace the chipping clay with another lump of clay, or else, try to reseal the chip.
- Once the structure dries up, using a sandpaper, smoothen the sides of the lantern by using a sand paper. Use sandpaper enough not to rub off the decorations on the surface.
- Once the lamp is smoothed, place a burning candle inside it. If needed, make two holes on the top, opposite to each other, pass a strong thread through it, so that, the lamp can be hung. If thread is not used, the lamp can be rested on the table or bookshelf to illuminate the place.
Quick Tips
- Use good-quality clay that does not chip or break when worked upon.
- Keep the thickness such, that light can perforate through the holes easily.
- The color of the clay should compliment well with the surroundings. Try not to use dull colors, such as, brown or black.
- Use a perfectly-cylindrical bottle, if possible. Also, try to experiment with odd-shaped bottles.
- Do not use much force on the clay. It may deform it beyond repair.
- Try to work with clay while it is moist. Do not work with dry clay.
- Use a sharp-pointed needle. Do not use very thin needle.
- For impressions, try to use large-sized stencils to get a single, complete, continuous pattern. If that is not possible, try to use stencils and designs with uniform patterns.
- Use heat to dry the clay. Oven-heat, hearth-heat and smithy-heat are ideal, though the Sun can also be used in hot and dry areas. Do not keep the lamp outside in case of a rainy weather.
- Use medium sandpaper for clay.
- Use the right sized candle. It should have lesser height than the lamp, and its thickness should be well enough to avoid the clay-walls from charring.
Things to watch out for
- Keep the clay at right temperature: neither too hot, nor too cold. Also try to maintain its moisture content.
- Do not use thin needles which make small holes that have higher chances of getting choked.
- Try not to make too many designs on the surface. It may lead to chipping of the clay.
- Try not to use extra clay to link the different edges.
- Keep the lamp away from strong-winds.
- Do not use oil-using light-source.
- Keep the lamp out of the reach of children.