
Roomba is the evolutionary vacuum cleaner created by iRobot. What separates Roomba from a normal vacuum cleaner is not only its disk-shaped structure, but its autonomous nature that makes its operation as a vacuum cleaner even more effective. Roomba, like its prototype, has filters, which help in removing dirt from the place. These filters collect all the dirt and rubbish from the place and congregate them in a plastic bag attached to them. This plastic bag can later be removed and emptied.
Like those normal filters, Roomba filters also get worn out with time, though it takes more time to do so. These filters, however, require replacement in regular intervals, except in the cases of punctured filters. These filters are quite costly – about $12 apiece – and replacing them frequently is quite impractical. In such a case, following are the set of instructions, which, if followed correctly, can lead to refurbished filters at a very, very low cost.
Difficulty Level: Easy (anyone can do it)
Time required: Totally depends on the skill of person and for skilled it will take about half an hour.
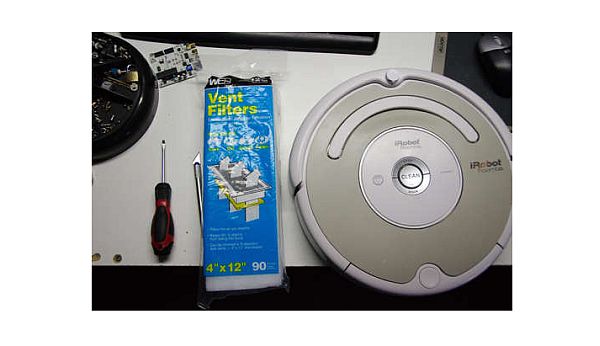
Resources required
1. Screwdriver
2. Knife or razor
3. Some 4 x 12 register vent filters which are cheaper
4. An aerovac-style roomba
5. Freakduino-chibi (optional)
Estimate Cost
As one will find out, this process is as cheap as 12 cents, which saves significant amounts of money, which would otherwise had been spent buying new filters. The only significant cost will be that of vent filters, which may cost around $4 a dozen.
Instructions
1. Remove the old filter:
First of all, remove the old, worn-out filter from the Roomba. For doing so, one has to be careful not to break the plastic.
2. Cut out the filter:
Using a sharp knife or a razor, cut out the the top and bottom parts of the filter-element. Once it is achieved, cut out the bottom-edges of the filter on the either sides.
3. Remove the filter:
After cutting out the edges, remove the filter material carefully without breaking its plastic. Why it is important to safeguard the plastic is that if this thing tears up, dirt will be spread all around, and it will take more time to clean the mess up. Once done, clean the filter-basket.
4. Change the filter:
Instead of using company-specified filter, use register vent filter stuff that is easily available in the home depot. Though its performance is not at par with the original ones, they have operated quite as fine, without hampering the operation of the Roomba. Take a filter out of the package and fold it into half along its long edge. Cut that line which will leave behind two 2 inch by 12 inch filters. Cut the filter again along the short side to get four 2 inch by 6 inch filters.
5. Attach the filter into the basket:
Roomba filter basket has plastic fingers that attach the filter between themselves. Gently separate those two fingers to feed the material into the basket starting with the first finger from the edge. It can be done more easily by using a screwdriver. Do not feed the entire filter, though. Keep its small portion outside. Repeat the process for the remaining fingers. Fold the extra filter material over to the inside of the basket and cut it off. Leave enough material outside so that it is held down in its place when the filter is reinstated in the Roomba.
6. Reinstall the filter into the aerovac:
While reinstating the filter, take care that a portion of the filter is held by the basket. This will keep the filter in place, and will enable smooth and proper functioning of the Roomba.
Quick tips
Roomba filters may be the major problem, but they are other problems that can hamper smooth-operation of the machine. In order to make sure that the machine remains fit, it is important to keep it maintained.
1. Use Roomba frequently. It is loaded with a rechargeable battery, and one of the properties of this battery is its life is longer if it delivers more cleaning cycles when used frequently.
2. Try not to let the machine’s battery discharge even when it is not in use. Always keep the machine plugged in. Use battery-charger to charge the battery. This will keep the battery healthy and the machine operational for a longer time.
3. Store Roomba in a cool, dry place. Like any electronic device, this machine also tends to degrade faster when the environment is humid and hot. Keep it away from direct sunlight and other sources of heat, such as radiators, stoves and heaters.
4. Keep Roomba in such a place that its Home Base is directly in touch with the floor. Do not keep the machine on a carpet or a cloth, as these materials are good charge-absorbers. These materials will cause indirect damage to the machine.
5. Keep Roomba’s brushes clean. If the brushes are choked by dirt or hair, the machine uses more power to operate, leading to damage to the machine’s mechanism and circuit.
6. Remove the batteries when the machine is not used for a long time. Keep these batteries in a dry, cool place.
Frequently asked questions
1. Can any filter be used for Roomba?
A. Yes. As long as it does not affect the operation of the machine.
2. Why should I leave a part of the filter outside, while inserting it inside the machine?
A. This is because this practice will keep the filter in place, which will ensure smoother operation.
Things to watch out for
1. Take care of the plastic bag, while dealing with the filters.
2. Handle the filters with care. The material is fragile, and gets torn up, if excess force is applied.
3. Choose the non-company specified filters for Roomba wisely. Not all the filters agree with Roomba, and choosing the wrong one will do more damage than good.
4. Do not use sharp edges on the machine.