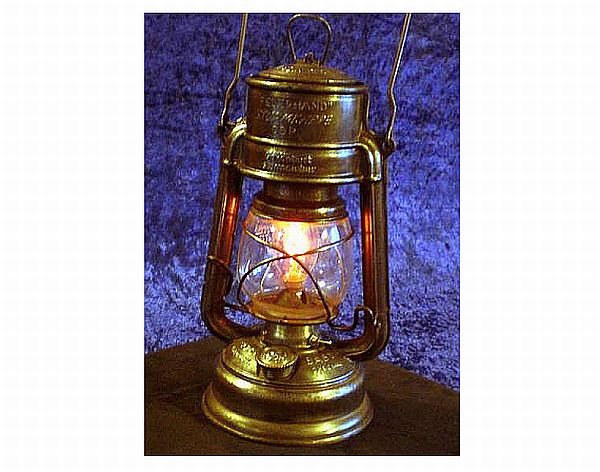
A thing of beauty is a joy forever. And this is because, beauty seems to have that feeling of eternity about it. This DIY project will show you how to create a beautiful steampunk electric lamp from an old hurricane lamp. The satisfaction and joy will be certainly high for you when converting a piece of junk into something that you would proudly exhibit.
Difficulty Level:
We would term this project as moderate.
Time required:
The actual lamp making will need about an hour. In case you are not comfortable making connections, add about half an hour extra. If your old hurricane lamp is really old and rusty, add two more hours. On the whole, even in the worst case scenario, you will finish this project within five hours.
Resources required:
- An old hurricane lamp
- Sandpaper
- Wire brush
- Steel wool
- Drilling machine
- Gloves
- Vaseline
- Round file
- Triangular file
- Pincers.
- A switch
- Battery
- Bulb
- Solder iron
- Wires
- Insulation tape
- A cleaning cloth
Estimated cost:
Actually this is a no cost project. For all the items required in the project will be easily available at home. The tools needed too are part of any standard tool kit. In case you do not have any of the items, you can easily procure them for a dollar store. On the whole, this will not be an expensive project.
Instructions:
- The first thing you would have to do is to scrape out the rust that has accumulated on the old hurricane lamp. Make use of the wire brush, drilling machine and steel wool to clean up the lamp thoroughly.
- After you are done removing the rust, wipe the whole lamp with a cleaning cloth.
- Apply a layer of vaseline all over the lamp after wiping it clean.
- Now approach the kerosene tank. This will be housing the electronics. Make use of the round file and the triangular file to help you cut the metal sheets inside the tank. After making the cuts, push the tin parts inside and fold them up. Ensure that the hole is big enough to hold the electronic parts.
- On top of the burner element, you will notice a ‘bridge’ that is meant to hold the wick. Use the pincers to cut this ‘bridge’ at the ends and remove it.
- The burner element has a surrounding ring. Screw the ring and remove it.
- The surrounding ring that has been screwed out has a small hole to fit in the wick screw mechanism. Widen this hole to fit the switch in.
- Drill a 2.5mm hole at the end opposite to the wick hole such that a 3mm brass screw fits into it. This will act as the connector for the other wire.
- File the mouth from which the wick would be lit so that your bulb can be screwed into it neatly.
- Connect the battery with the bulb through the switch. Make the connections and check whether the bulb is working along with the switch.
- Place the electricals in the tank of the hurricane lamp. This includes the battery holder and the wires.
- Screw back the ring with the switch on it.
- Place the glass globe back in its holder.
- Now screw the bulb into the candle holder.
- Connect the live wire (which is red in color usually) and solder it to the bottom contact of the bulb.
- Your steampunked lantern is ready for use.
Frequently Asked Questions:
Q1. How can I elegantly fit all the electrical parts?
Ans: Here is a cool way to fit in all the electronics perfectly. Get a old film box. This is a cylindrical chamber and it would be the best way to fit in the whole electronics. Solder the wires to the ends of the battery and insert it into the box. Before doing that, make two holes at the two ends of the box. The wires will lead out through these holes. One wire goes to the switch. The other wire goes to the brass screw. This box can be be glued into the tank. Tape it for extra stability.
Q2. What do I do if I do not find an old hurricane lamp?
Ans: You need not worry about not being able to find an old hurricane lamp.You can simply buy a brand new hurricane lamp. Remember, you will be converting it into a steampunk lamp with electrical light. Actually, buying a new lamp will reduce a lot of efforts as you will not have to remove the rust. It will also reduce the time required for the project by two hours! So, just go ahead and buy a new hurricane lamp.
Quick Tips:
- You can artistically paint the glass on the hurricane lamp to enhance the lamp’s beauty.
- When you file the wick mouth for putting the bulb, keep checking with the actual bulb every now and then.
- Instead of using simple electronics as described here, you could use a different set of electronics that produce a flickering light. The effect it produces is cool and it will definitely enhance the look and feel of your lamp.
- Use different colored wires for the neutral and live connections. The usual colors that have been standardized are red for the positive terminal and black for the negative terminal.
- You can spray golden paint on the lamp to enhance its looks.
- The lamp can be used for Halloween. You can impress the visitors who are sure to be staring at it!
Things to look out for:
- Be careful as you clean up the rust on that old lamp of yours. It is advisable to wear gloves and also wear a pair of safety glasses when you use the drill.
- Exercise caution when you push the tin inside the tank. You might hurt your fingers.
- Ensure that all the wires of the electrical circuit are insulated so that you do not receive shocks later on.
- While using the soldering iron to solder the wires, be very careful. The solder material reaches high temperatures and can cause a bad burn if it comes in contact with the skin.


