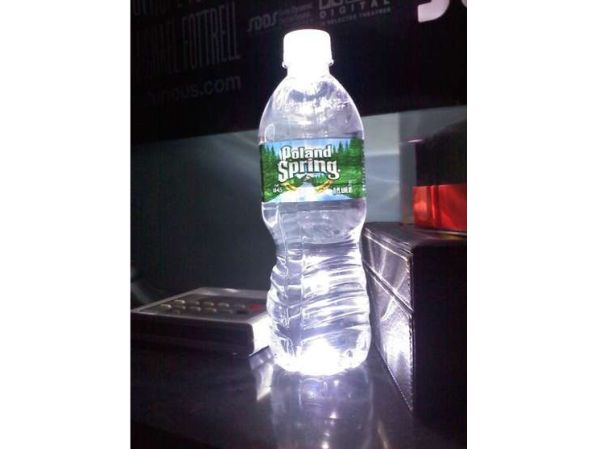

Water has some beautiful characteristics when it comes into contact with light. Refraction, diffraction and scattering are three scientific phenomena that occur in water. The theory to understand these may be tough but it is very easy to see their magic. Shine a torch through a transparent bottle of water and see the magical effects that are created. You can make these magical effects a permanent feature in your homes by making your own water bottle flashlight. This project will guide you to make one.
Difficulty level: This project can be graded as ‘easy’ and even a beginner can do it.
Time required: The estimated time to do this project will range between 30 minutes to 45 minutes.
Resources required:
- Any cheap flashlight.
- A plastic water bottle which is transparent (The bottle must have a concavity at its bottom and must have ridged legs like a 2 liter CocaCola bottle. This is important.)
- An alligator clip
- Transparent sticking tape
- High powered LED light (must be as flat as possible)
- Paper
- Soldering iron with solder
- 2 feet of 22 gauge wire
- Pliers
Estimate cost: Most of the resources that are required for the project can be easily purchased in one dollar stores. Thus, the whole project can be completed within $10.
Instructions:
- The first step is to dissemble the flashlight and separate its components. Firstly, open the cover of the flashlight.
- Remove the batteries that are inside the flashlight case.
- There may be a thin metal film at the top that holds the LED in place. Use the pliers to remove the strip.
- Remove the LED light. Usually, in cheap flashlights, the LED comes out from the front. In some of them, it will be a small bulb. Whatever be the case, you will have to use a screwdriver and push it out gently. In case it is sitting tight, use some gentle force and get the unit out.
- Take the 2 feet long wire. Strip both its ends.
- Solder one end of the wire to the LED.
- The other end of the wire should be split to two. One end should be attached to the positive connection of the battery holder. There will be a small ‘+’ symbol to denote the same.
- The other split end should be attached to the alligator clip. This will be later attached to the negative terminal. Again, this will be denoted by a small ‘-‘ symbol.
- Use the piece of paper as a placeholder beside the battery holder and then push it into the battery compartment or the cheap torchlight. Fold the paper as much as required to secure the battery holder firmly in the case.
- Now connect the alligator clip to the negative terminal that the flashlight case provides. Check whether the whole set up is working.
- This is the part where you have to be most careful. Take the transparent tape and tape the LED to the bottom of the bottle. The LED should fit neatly in the dome shaped crevice at the bottom of the bottle.
- Take the wires out through the ridges along the sides of the bottom.
- Power on the light and enjoy your new and unique torchlight.
Frequently asked questions
1) What is the utility of this light?
Ans: Utility wise, the light will serve as a small table lamp definitely. Its value lies in its decorative potential. The light has a lot of dispersive power. So, rather than focus and light up a single spot, it can light up a whole room with dim light. Since it provides dim lights and the water in the bottle throws up interesting patterns on the wall, the light can be used as a night lamp also. And it is so easy to make the lamp too. Along with being easy, it is loads of fun. So, if you ask about the utility of the light, the answer will be the combination of the fun and night-lamp with that of a decorative piece.
2) How do I use the soldering iron? Is it very difficult to use?
Ans: The soldering iron is a very useful tool for making connections in an electrical or electronic circuit. The soldering iron consists of a rod with an in-built heating element. When powered, the rod gets very hot. Solder is an alloy of tin and lead and it has a low melting point. The solder is available as a wire. Melt a bit of this wire with the hot tip of the soldering iron. Use this molten alloy to join wires or seal the wire with a terminal. This is possible because the molten solder also cools and hardens quickly. All you need is care while using the soldering iron. It is quite a simple and easy tool to handle.
3) Can I make this as a project for my child?
Ans: Definitely! In fact, this project is so simple that it can be used to teach the children basics of electronics. It can also be a useful tool to teach them soldering. Usually, when you teach children something, they are eager to learn only if they perceive a good end result. The final result here is really wonderful and the kids are sure to love it.
Quick tips:
- You can use thinner wire to make the wires seem ‘invisible’.
- If you install a small lens in the bottle cap, you will be able to see more magical effects. This will also focus the light coming out from the top.
- Use different colored LED lights and create amazing effects.
- You can also try to color the water in the bottle and check out the effects.
Things to watch out for:
- The way to dissemble a torch will differ from model to model. However, the objective is to separate the battery holder, the LED light and the flashlight case.
- Ensure that the paper holds the battery holder tight in the case. It should not move or slide.
- Be careful while you are using the soldering iron. Ensure that you do not suffer burns.