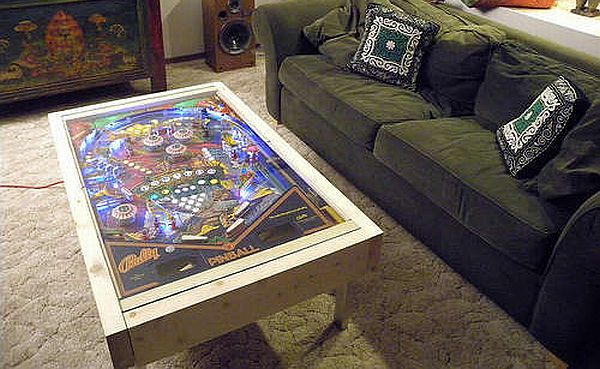

Many of us have dumped things and furniture that we never thought we could use again. But, if you have a pinball table that has been dumped or is no good use to you, then think again. You can carve out a beautiful coffee table from this piece and use it to decorate your home. It is a great addition to the interiors and all you need to do is follow a few steps and make a table out of the main playing surface.
Difficulty level: Moderate
Time required: Around a week (less if you work faster).
Resources required
There are several resources that can be used for making this coffee table, but it depends upon the availability of items and/or what you can get from a shop nearby. Particularly, you need a pinball machine, lumber and plywood. For fixing you require screws, staples, hot glue, tempered glass, aluminum stock, and wood glue. You can also get a few strings of LED Christmas lights. Apart from these, you can get these items that would help in tit bits and allow you to get everything together. These include screw drivers and pencils, tape measure, drill and bits, wire cutters, bolt cutters. You can also get some of these items depending upon availability. These include glue gun, staple gun, small nail gun, miter saw, bench grinder, pliers, reciprocating saw and belt sander. Once, you have these things you are ready to go!
Estimate cost: This pinball LED coffee table won’t cost you much as most of the items, tools and materials are available at home (unless you decide to buy a new pinball table to make a table!). But you might need to buy a few things like bolts, screws and hot glue if they are not available.
Instructions
1. Once you have collected all the tools and materials and found a discarded pinball table in your garage, the first thing you need to do is to disassemble the pinball machine. Remember, you don’t need to use every item on your pinball table, but that doesn’t mean that you throw the rest in dump. Pinball table, particularly the older ones are collectible items, so stick on to it.
2. Remove the scoreboard area first, then the legs and later remove the guts. You can ask somebody to help you. The flippers shall not be removed along with other items on the play surface. If the mechanical work goes too far below the play surface, then you can fake cutting off and reattach it later.
3. Now, the next step is to replace the incandescent light bulbs on your pinball table. You may have several LED Christmas lights that go useless once the Christmas is over. Therefore, you can use them here. Firstly, remove the incandescent light bulbs. Then, you should remove the plastic ends of LED lights and make them look like ‘icicle.’ The plastic can easily come off with a twist of fingers, although some may need wire cutters or pliers for clipping. Then you have to use hot glue and staples to fix the lights on the back side of the board. Be cautious enough that you don’t pierce the insulation wires when you use a stapler. Preferably, stapler must be used only at the places where the lights infiltrate through the play board. Otherwise hot glue can be used for positioning the lights against transparent plastic inside the table.
4. The next step requires you to fix a tempered glass on your pinball table. You can order a tempered glass that is of the same size as the pinball table. Otherwise you might use the glass from the machine. This is ideal because most of us don’t have the tools to cut tempered glass. Act like a carpenter and use plywood or cedar for the frame. A groove of plywood would add strength and rigidity to the table. Use stainless steel screws for framing the counters. Add strips to support the glass on the top.
5. The last step is to fix the legs on the table. You must have some rectangular stock in your store or garage. Use them for making the legs of the table. Drill holes and use screws to attach the legs. This might appear tedious, but the end result will make you proud of yourself.
6. Lastly, put an electric outlet for the lights and enjoy your brand new pinball LED coffee table.
Frequently asked questions
Q. Do I need to use the pinball table?
A. Yes. Most of the times pinball tables are used for gaming, but after a few years, they find their way into the store room and are left discarded. Therefore, you can reuse them as a coffee table and make use of the junk creatively. This would be a cool addition to the interiors.
Q. What materials do I need?
A. You need several household tools and materials to build this coffee table. Collect all the material beforehand as you might not want to run to the market to buy screws every time you decide to work on this project.
Q. Do I need LED lights?
A. Well, you can use incandescent lights that are already etched to the pinball table. But when you are doing a lot of hard work, then why not use the old LED Christmas lights and make your coffee table even better!
Q. How much time will it take?
This shall probably take a week. If you ask a little help from someone, then the work could be completed in less than a week. Plus, another pair of hands will also give you more creative ideas to transform the pinball machine into a cool LED coffee table.
Quick tips
1. If you are not great at carpentry, then ask a friend or neighbor to lend you some help.
2. Use stapler cautiously when you are fixing the LED lights so that the staple pins don’t cut the induction wire of LED lights.
3. Make sure that you use stainless steel screws for fixing glass and legs so that the strength of the machine is maintained. Also, don’t throw rest of the stuff of the pinball machine as creative ideas can flow any time and you can make something from rest of the material.
Things to watch out for
There are several things you need to watch out for, particularly when you are fixing the LED lights. Make sure that you don’t cut the wires with staples. Also, when you are using tempered glass, be careful and get it of the same measurement as the pinball machine. Don’t cut the glass yourself, it is tedious and may require several heavy tools. Attach legs with rigidity, so that the machine has strength and durability. The electric cord should be connected to an outlet so that the LED lights can make you table look really good.
So, start building. Let your creativity flow!