
The world has changed a lot in the past one century. Now people don’t live their lives in large homes with huge spaces for keeping their important things. Today people have to toil hard and live in small, urban apartment where the spaces are so small that you need to think a lot before bringing a new piece of furniture. Thanks to stiff competition and rising prices, you even have to compromise with several household items just because you want to save some extra money. In this article you will learn how to make your very own cardboard bookshelf.
But if you are a book lover and have tens of books in collection then what would you do? Would you buy an outrageously costly bookshelf for your small house that would take up too much space? Probably, you won’t. So, here is way in which you can craft your own cardboard corner bookshelf easily.
Difficulty level: Moderately Easy
Time Required: Less than a day.
Follow these tips to make yourself a nice cardboard corner bookshelf that wouldn’t take too much space and would also help you keep your book collections safely. The best thing is that this is relatively easy to make.
Resources required for your cardboard bookshelf
To make this exciting and intelligently designed cardboard bookshelf, you need following items:
1. A piece of cardboard, preferably some electronics box like that of a Television or Personal computer.
2. A box cutter along with hot glue or cold glue
3. Hot glue sticks
4. 8 L brackets with screws and nuts and a screw driver.
5. If you want to add some creativity to your bookshelf than also include items like acrylic paint and clear topcoat.
6. Don’t forget to include paintbrush, scissors, chalk, markers, water color tape and rulers to get the ideal cardboard bookshelf.
Estimate cost: Relatively cheap. This product is economical as well as usual. This bookshelf won’t burn a hole in your pocket and won’t compromise with the aesthetics of the house.
Instructions for your cardboard bookshelf
1. Get Cardboard pieces:
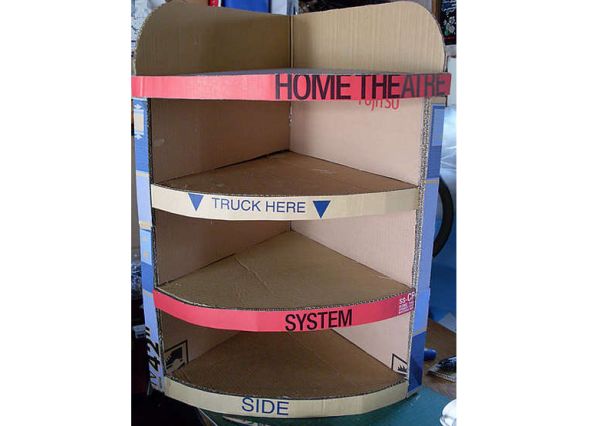
Take a tall cardboard and cut the corner section of it. Place it at an angle, preferably 90 degree angle to use it easily. Now trace and cut two more pieces of cardboard at the same angle (2 or 3 ply). These pieces would serve for each level of your bookshelf. These shelves will have a top and bottom layer that shall be supported by horizontal bars. These struts would support the shelves of your bookshelf and provide it required durability.
2. Connect the pieces:
Now you need to connect the pieces of your bookshelf. For this you need to have a double thickness preferably 6 ply piece of cardboard. This would form the base of your bookshelf. Water color tape can be used for the edge finish.
Now cut horizontal struts in a straight, linear fashion. They should be accurately measured for even finish of your shelf. After the struts/bars have been made, use hot glue or cold glue and stick the struts to the bottom layer. Make sure that your struts are about 2 ply each.
After the strut is stuck to the bottom layer, put the second piece of shelf cardboard above the strut and fix it with the hot glue. This way the bar would be sandwiched between the two layers.
This is the basic way shelves are to be built. For the next shelf level, adjust another strut over the bottom of strut with the help of hot or cold glue. Here you can use a 2-3 ply cardboard shelf depending upon the desired thickness and durability you want from the bookshelf.
3. Strengthening the edges:
Once you have followed the previous step for a desired number of levels (3 or 4), you need to file down the edges to make the bookshelf smooth. Edges should run vertically straight. Now, after you are satisfied with the positioning of the shelves, glue and secure all the raw edges. Use water color tape for the smooth finish.
4. Variations:
You can add a central pole through your bookshelf if you want it to hold heavy items. If you are not going to load your bookshelf, then you make a different version of this shelf where you can have layered shelves in a semi-circle shapes instead of angular shape.
5. Finishing touches:
Give your bookshelf an aesthetic feel by coloring it with an acrylic paint that matches your house’s interiors. You can draw figures on the cupboard of just keep it simple. Make the bookshelf reflect your inner self and be as creative as possible. Cover the paint with a clear topcoat for a really smooth, shiny finish. Allow it to dry before you keep your items in it. And before you would know your bookshelf will be ready!
Quick Tips
1. If you are a first timer then go for angular bookshelf than the semi-circle one as it easier to make than the latter.
2. Add a center pole if you want to strengthen the structure.
3. Keep all the materials ready before you begin the task.
4. Use 2-3 ply cardboard for shelf, 6 ply cardboard for bottom and 2-3 ply cardboard for the bars.
5. Measure the shelves correctly. This can save a lot of time once you start making the bookcase.
5. Use paints and colored taps for creative, artistic finish for your personal bookcase.
Things to watch out for
1. Never forget your rulers and scissors. These can help you take precise measurements.
2. Be careful with cutters. If you don’t use them correctly then they can ruin your piece of cardboard.
3. Don’t make too many shelves as this would reduce the durability of your cardboard bookcase.
4. Make sure that you use hot glue or cold glue for fixing the apparatus. Use of normal glue would compromise on the utility and strength of your box.
5. Also be careful with the paints and colors you wish to use. Do tests before you apply the colors so that you feel satisfied with how you want your book case to look.
Frequently Asked Questions
Q. What kind of cardboard shall I use?
For making this bookshelf you can use recycled cardboard boxes or cartons in which your television set or refrigerator was delivered. Depending upon the required thickness, you can use different types of cardboard for your bookshelf.
Q. At what angle shall the cardboard pieces be placed?
You can select any angle for the cardboard pieces but select 90 degrees angle if you want to place your bookshelf at a corner.
Q. Can I use anything other than hot glue?
Yes, you can use a cold glue if you want, but make sure that you know the durability and strengthening capacity of the glue otherwise the shelves won’t be able to take much weight.
Q. Can I cut shelves in different manner?
You can cut your shelves in semi-circular shape if you don’t want to have straight shapes. That depends on your crafting skills.
So, what you are waiting for? just grab simple tools and make your own household furniture!